Quoting it’s predecessor’s starting message (and post starting message):
Powered By

Za Warudo

And
This is my desire:


Might one day be like this.
Quoting it’s predecessor’s starting message (and post starting message):
Powered By
Za Warudo
And
This is my desire:
Might one day be like this.
Subbed
So… just so we are clear the previous thread was about making a game. Eventually for the making of the game, tools where necessary, and an actual engine was necessary. Which lead to an engine’s demo that would consist on 8 1st phase engine designed levels.
I stopped at 4 levels and a how to play. The engine became ever more complicated and each actually level had to be done mostly by hand, even levels with the same mechanics, but just different graphics, was a handful of work by hand like I was doing at the 4th level.
I had other worries in my life in the meantime, left the project hanging.
A couple of days ago I brought it back to life. Still compiles the entire project like a wonder on this they PC and new System.
And like the previous thread, I start this reboot of the project also making tools. So what’s the plan here?
Create an actual design and compile kind of tool. For now I would write the engine on a simple text editor with project setting for code. But right now the engine is still not a library (because it is still under development) so the assets from the game (maps, graphics, texts, events, sounds and so on) have to be compiled directly with the code. However to create a room (a level), I have to first draw the 16px16px tiles to draw the level, draw the graphics and the collision logic layers of the level on the tiled tool. Save the graphics layers designed on Tiled as BMP, and open a graphics program to convert those images into arrays of written pixels in codes of 0x001461A5 in c code. But just one example of each 8px8px repeated graphic tile, from each 16 tiles I used to graphically design the level. And from 8x8px (at any 90deg rotation) palette of tiles, the graphical program save the tiles into pixels, and the image into a grid map of numbers relative to the palette of tiles. After having the graphical program giving my c code for the backgrounds, I add actors that I already have done, each with it’s own AI (set of scripted events), musics, sounds, and level collision logic (parsed from a Tiled file into the personal c file format by a program of my creation), all into once class called room. That’s the level.
Even the “how to play” demo is a level, but you have the input cut, and a sequence of events programed to the character actor and other actors in display.
SO… basically this is already quite a lot of crap, and what I want is a tool that I can make everything inside.
map edition like tiled, 24pixels bitmap to GBA format pixel c code array, automatic Image mapping, display and edit event, action lists, and organize and save everything into proper c code, room ready to compile. I’ll also try to have some kind of graphical system to sequence rooms one after the other.
Till now I’ve debated with Windows Fors and Visual Stupio Express something into locating an older project file. Not the actual game code, but only the resource, that even though they are compiled with the game code, resources are very well separate in different files, on a different folder from the entire game engine code.
So I detect the folder, load the project code file and get each rooms, which I then display each room as a small drag-able box, that maximizes into the entire working area of the program’s window and will display each of the bulk components that do a room code file. Once clicking on those components, they maximize and provide the adequate tools to edit that specific component. Imagine the level designer, a grid tile editor like Tiled, already editing based on one engine acceptable format on both pixels tiles and level collision logic. Being able to directly pick, and edit actors and place them on the map with a drag.
So on and so on.
Anyway, so the 8 level demo will be post pone for the compleation of 4 more 2nd phase design levels.
That means, having a tool of my making to do the edit necessary to do the same as in the « 4 previous 1st phase design levels, but all from my GUI tool.
I’ll try also to have an installer by then that install Compiler, necessary libraries, necessary programs, and necessary linking through all the components, into one box, and ready for people to design simplistic level designs to Gameboy Advance.
Ok on the following link you can get a version that will have the How to Play, and 4 test levels:

Works on most GBA emulators, I personally advise VisualBoyAdvance.
And here is a couple of picture of the going on for the tool:
I’m thinking about changing it from Visual Studio + Windows Forms for Openframworks… which should probably be a bit too open source to make the deal, but I would like to try some of their crazy GUI libraries.
Btw… I mentioned “windows forms” many times because I am really hoping someone sends a C solution comparable with Visual Studio.
I already do most of my work for the windows from within the code. But sometimes that GUI for designing your own application is a priceless help.
Haven’t done a single post for a good deal of time, so I’ll do a picture exposure… because I haven’t really worked on this.
Eye Candy:
From the previous exposed map:


Sometimes is good to lose an year of your life… So I just did.
I’m just giving a bump to this thread, so I might remember myself to post again, maybe even more frequently.
Anyways, forget about Windows Forms and C#… Decided to go C++ and Qt using Qt Creator.
After fighting with it for a bit at first, I actually like it pretty much. Yeah yeah C# is quicker to work with, and all that memory managing really feels nice for application creation. But I like just how C code looks, feels, and the errors it creates. Also… It will be a good halfway to port the engine for PC in the future. Maybe even visualise your stuff going going engine like in real time… I have no idea what I am talking about.
Anyways, I was able to import all the relevant project data to the application, and organise it into proper classes to be used by the editor.
When I say import, I actually mean: open the C code file, “read” the code text, and know what to get and where to pur, and what means what.
Basically, with my engine, what actually describes a game are a bunch of structures, with number… Erm… Going wild. These structure declarations are on C code files, and are then compiled to the actual game.
Some stuff were pretty straight forward to import, like backgrounds and visual effects. But stuff like actors (basically everything interactable) and rooms (levels), collisions and whatnot… Some where pretty dense.
Anyways, those are behind me, and now I’m already giving some work to the editor stuff. So yeah… A few screen shots and I’m out:
Yeah, not much stuff done since yesterday… but well… sure I just finished something and yesterday I did the post because I wanted to remind myself to start doing these kind of posts all over again. So sure, whatever.
What matters is that yeah, I finished the Options Menu section for Layout.
You basically select the colors for the editor’s layout. This is not exactly critical work but I can only say that I like to do pretty stuff. Working on something that pleases my eyes also usually motivates me a bit more.
This functionality already comes with 3 embedded layouts, each with 2 variations:
This last picture holds the Standard Layout for the application (dark backgrounds with light blues).
Overall the editor looks like this so far (some very calculated screen shots so the editor looks with so much done and so busy busy…):
Did an early work on my tile map editor for each of the Rooms.
My idea here is to actually be able to visualize all 3 possible layers, each with possible different sizes, as well as all tile collisions, camera collisions and whatnot.
Yeah I know this sounds confusing, but one of the hardest times I had doing the backgrounds on tiled, was that I couldn’t make all of them in one single screen.
Well sure I could, but they would have to have the same size… and the parser I did that converted the collisions layer… you know what? Whatever, I was doing each layer on it’s own most of the times, and I didn’t liked it. I wanted to see it all.
All I did so far was actually allow to visualize all (up to 3) layers on the screen, nothing else.
Wanted to learn to work with some Graphics View classes, and since I am not experienced in Qt, seemed like a good experience for the future.
Also added some controllable Zoom into the mix. Eventually I will probably add the option of viewing just the exact screen area, and do some correct layer scrolling, depending on the scrolling time for each layer.
Pics:
Just for the sake of archiving what I just achieved, I’ll post here the same worlds from my GIT Commit text.
I explained in far better words under the commit text that I could ever hope to right here and now.
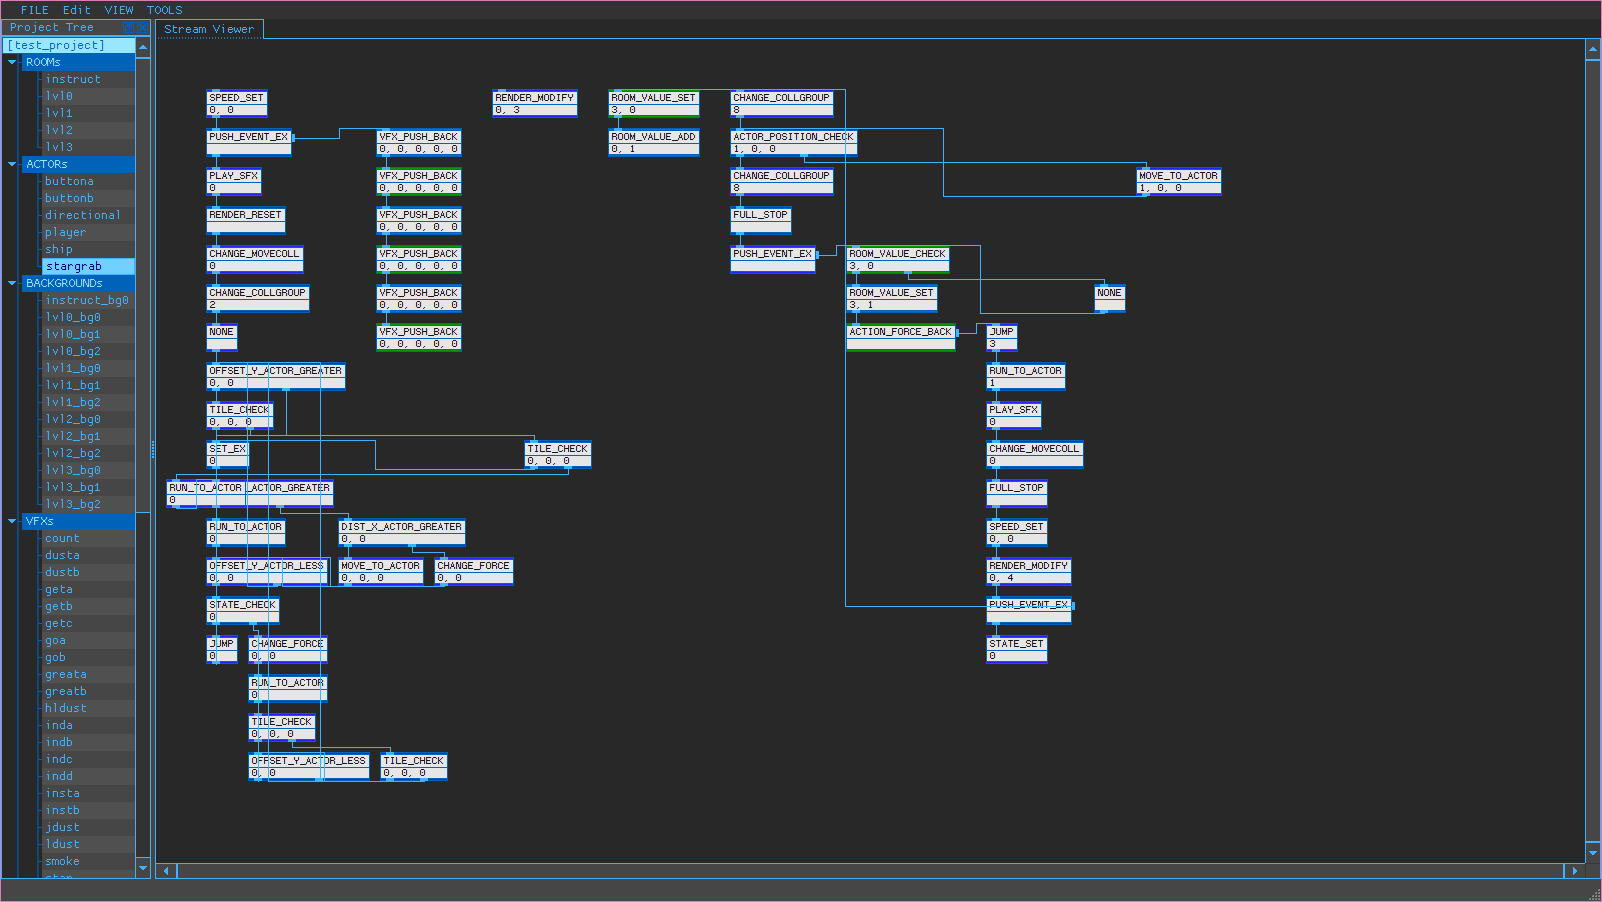
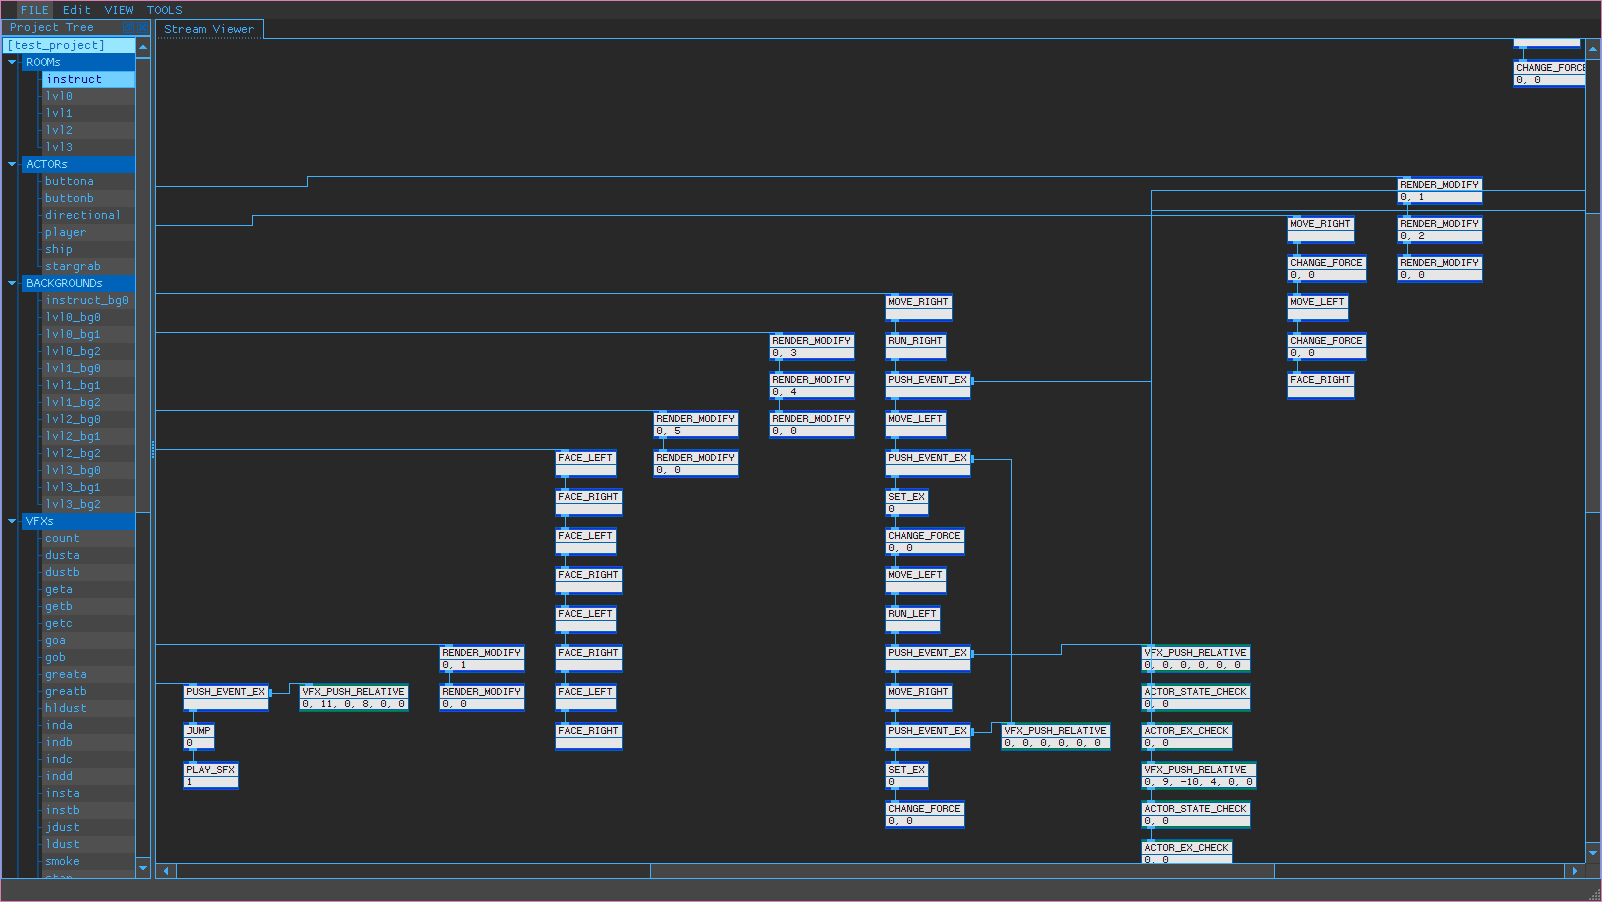
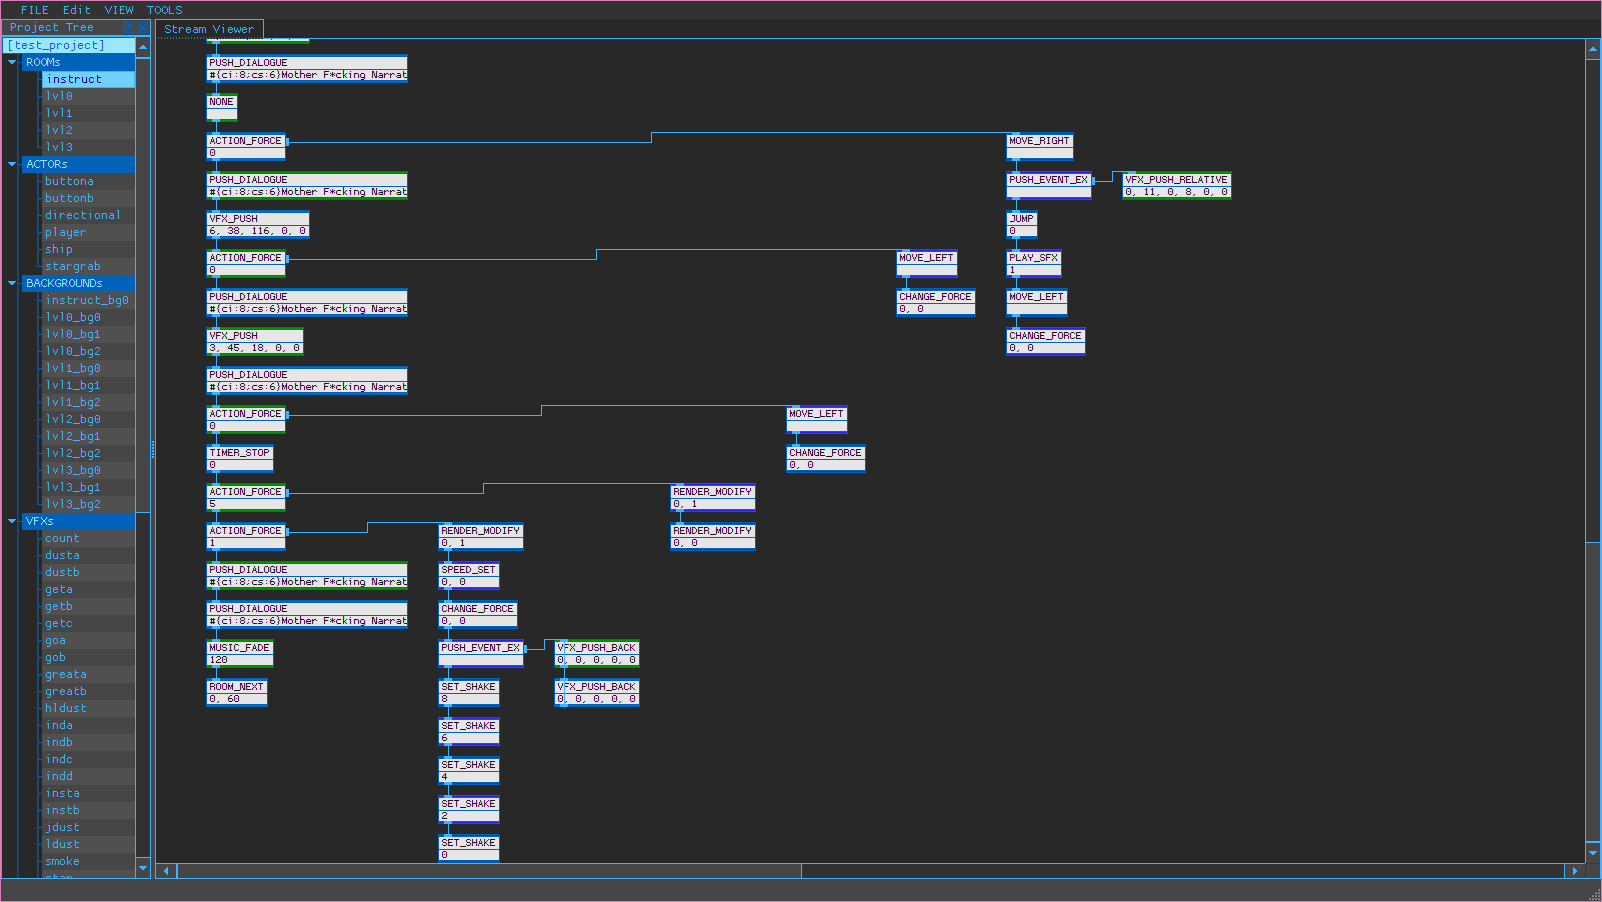
So basically I have achieved visualisation of the actual “scripted sequence” of Actions and Events I have on my GBA Tech Demo rom.
I’ll show some pictures of the visualisation of this C code, scripted C code, into visual information:
This pictures describes the entire AI for each of the Tech Demo’s Stars, on the minigame of said demo - https://goo.gl/jTyaSN
This is part of the sequence of Events and Actions for the introduction level for the Tech Demo’s minigame - https://goo.gl/UXGWwP
And this is another part of it - https://goo.gl/zcrvYT
I’ll really have to clean some code now, cause I was away from this project for a bit. I don’t have as many stuff from the project as fresh as before.
But even after such absence and consequent insecurity, I decided to tackle, and pull it out, the problem that was having a linear “game script visualisation” or something.
Right now I can’t move around the Stream Nodes like I used too, because all the connections and lines are actually on another layer, on top of the actual Nodes.
So it will end up being kind hard to get mouse and all the other input, plus the individual paths selection for necessary deletion and addition of such, and send it under the funky-cool-lines-between-nodes’s layer into the actual Node’s Layer.
Anyways, still a ton of work, but this scariest part is done and only needs getting better.
Ok I admit I changed the text, correcting a what I knew how, and kicking it here and there.
Also decided to upload these here:
BTW, in the meantime I did those horrible things to actual game consoles that you can watch on this galery:
https://photos.app.goo.gl/tYtLNSHlzbDgz68t2
There’s also pie.
Yeah, kinda said I had to clean code… but… erm… kept coding small fixes and features… just going along. Anyways, let me fill a cup with favaios.
So I re-enabled the nodes movement, and with the links moving along with them, re-positioning, updating, and all that.
But I’m starting to get really confused and I’ll need to realize what I want with this part of the editor. I need to list the features I’ll be implementing next, or I’ll lose myself between my intention and the intensity of the code.
The idea for this “script editor” came a long time away back when I was studying with Max/MSP.
Max/MSP, now called just Max, is a… erm… “Max is a visual programming language for music and multimedia developed and maintained by San Francisco-based software company Cycling '74.” (wikipedia).
You put boxes, you connect boxes to other boxes… and does stuff. I did a very faithful NES synth for it one, for a class. This language is primarily used to create digital musical instruments and on the go video editing programs.
The base code of the tool is C, and I did went just a tiny bit into programming C for that.
But my plan was to get that “type” of language to program a video game. That’s where I did very creative and imaginative (noob) reverse engineering and did the system for my engine that basically does a stream of game orders during one frame or various frames. These game orders could be theoretically be anything that defines the rules that creates a game.
So the final idea would be to allow people to define the values of these game orders, and how they connect and sequence one after each. Eventually allow people to program their own order in what could potentially be a very simplified form of C (not too sure about these part… but I should do it).
Right now I have a pretty good deal of stuff done, so what do I need now?
[edited]
Yeah… still quite a bit just for the scripting section of this editor.
I guess it’s time to work on it.
Ok, I’ll have to edit that list on top.
I’ll just do the cleaning now because I really need to clear up my head about this part of the project before going into that more… complex stuff.
I kinda did the aligned links adjust their position (I can tell hinges), but it’s not coming out well and bugs are starting to show up. Before I code something really stupid that I won’t notice afterwards except with painful debugging… I’ll just clean.
Also to clear my head I wrote and drawn these:
Hopefully they will help with the cleaning of the code, and come out the other way with some pretty functional and advanced system.
Ok… I really stopped with this one.
However I did something for the… overall project… that I did not post in here.
This was it:
Yeah… it really looks unimpressive on a picture on a post.
Anyways… context. It is evident that I am creating this engine and editor to create my own game. I do the tools around my game for personal growth, and future usability or modification for other projects. I dunno, dreaming wild even adding 3D and DS compiling.
Still, and too many times, I get tired of doing always the same thing. And on the previous particular moment of cleaning code and clearing the head for the continuation of the project… I just got tired of it. At least the editor’s programming bit. So I decided that I would spend some time defining the world of the game.
I have a few drawings, specially the first map-thing from the first post. I have a pretty good idea of the path I want to take on that map, but I’m lacking details. Where exactly, what leads where and so on.
So “sure” I said. Lets go a bit more in depth of that. And since I’ve been working on that map viewer and map editor inside the engine editor, I decided to at least plan the maps that would detail a linear path in that world.
And I ended up with that map.
What I’ll be doing in a foreseen future is look at the editor’s code in astonishment having no idea what I coded, what for, and how… but figuring. So I’ll keep this post as it is right now and then post more detailed scans of maps, with a few explanations and a more accurate placement of those “levels” into a notion of world map.
So this is how I’m going to make this post. This will be a 3 or 2 part post trying to give an idea of what tile maps go where within new and old pictures of the world.
At the end of the 3 or 2 posts, I hope to have the map on the post above covered and explained.
So has on another post up above, I start with whatever serves as worldmap for now.
For this first post we will be talking about that [A] area at least.
The [A] area on this new map is correspondent with the [C] and [D] of this other previously presented map:
The [C] section of that map

had the following sketches as their 2D side cut counterpart.
This sketches are now defined on a slightly more permanently state as in form of the ROOM “Something About Starts” on the Big Map:
As for the [C] section of the older map

I exposed a more… artistic view of the area.
But on the Big Map it is represented only by it’s front, which is the ROOM named “NFS Frontline”:
As you can see, this map as a smaller extra room. You are supposed to get into the smaller ROOM by accessing it through one of the entries described as black areas on the bigger ROOM.
However… this small ROOM would in reality be perpendicular to the bigger ROOM, meaning that you wouldn’t see on the map any more than a line if the ROOM is a plane.
I just wanted to state this now to explain later the need to have a new idea in how to view the worldmap that can accommodate the kind of world architecture I kinda have cooking around.
The third and last map of this group under the Big Map is one that I haven’t drawn yet. This would be the front of the mountain to the right of the [A] area of the worldmap (first picture). This would lead to the top of the mountain.
This would be the end of the first group of the worldmap. Basic linear beginning. you can’t go anywhere else and avoid death.
This would be the end of the first post, but lets check if I can do the second group/post still today.
To start this second worldmap area/post I’ll go back to the worldmap.
It’s a rather difficult area to represent on the worldmap because it goes into the back.
Can you see on the right of the area again the mountain? Well… this new area starts on the back of the mountain, and then the area continues into the back of the map.
This area is actually not all that better described on it’s more artistic representation that was presented again in a previous post.
To the right you have the said mountain, being the absolute right of the drawing, the mess of oranges? That’s the front of the mountain. Directed to the camera the left side of the mountain from the worldmap view reference.
I wish to relay another 2 points of reference on this illustration.
On the upper left corner of the drawing, the blue and pink thing? It’s the start of the game.
Another point of reference would be right on the centre of the upper left quadrant. That darker line where both forest and river disappear? That’s an important reference.
It was becoming painfully obvious that I needed a more more technical view of the area composed by both areas [A] and [B]. Lets call it here [B2] and not consider it a real area.
To get that better view of how a character could possibly walk in there I did the following.
I hope it is visible that both the start of the game and the front of the mountain are respectively on their left and right lower corners.
We can see described the entire first area with different names. The actual start of the game, the “Something About Starts” as First Leg, “NFS Frontline” as First City, and the front of the mountain till the top as First Dung.
Then the path continues on the back of the mountain that has much less inclination, and slides all the way into a river that comes from forest at the left of the end of the mountain. This river circles all the way to the top of the drawing. The river finishes even further to the left of where it started. This is where it falls into a smaller, higher lagoon. This point where the river falls is the same where it simply disappears on the illustration, it falls.
So lets focus on the first stretch of path that goes coloured from the top of the mountain, though the top of the drawing, ending in Lagoonode.
This maps would be:
“Mountain Back”. Nice name. This is the bit of mountain on the back of the top that exists above a fierce sandfall. Yeah… the pink lines are sand falling. This will be the first ROOM with path choice, if not possible to make it right a the top of the mountain. I developed a few maps that Go around this one in more than one path, but I only continued to draw one single linear path.
One path would be through the left side of the room. You would fall on the right ledge of “Mountain B.2 EofW”. This path would eventually lead to the End of the World, and whatever I want along the way. Since “Mountain Back” view is turning away from the camera on the worldmap, this path would leave through the right (not left) of the mountain.
Another path out of the “Mountain Back” is through the right side of the ROOM, or down the right side of it’s lowest platform. This would lead to the following map, “Start Sandboad D.” This was supposed to mean Start Sandboard Dungeon. Possible sonicu snowboard on sand level style… maybe… But this map is the start, you fall into the sandfall on the back of the mountain at the bottom of this ROOM.
The last path is the one we will take, that is through the bottom of the left side of the lowest platform on the “Mountain Back” map. I don’t have it described on the “more technical drawing”, but imagine going though the ledge on the right side of the sandfall.
This is “Path2 Gridlock”.
Finally we reach the right side of the valley in “Gridlock”. This might be the end, or an early exit of the Sandboard Dungeon. Right at the bottom of this ROOM you have the river passing, connecting with the sand on the right. You’ll have people here… maybe, you can. And there will also be an upper area… maybe. But we will leave though the leftmost exit, and take the highway on the sky.
Which is named “Skylock”. We jump out out of the wall on “Gridlock” into the flying platforms that make a path over the forest. This map is in my opinion one of my favourites, but ultimately a disappointment. It is even possible to make it smaller in various points to the bare minimum. That’s described as the A# on the drawings. Most of the ROOMs I drew at the start have optimisation possibilities.
But I might end up doing the same configuration but with much more width. And then use some kind of wind physics to be able to only do this path from right to left because the stupidly long jumps are only possible with the help of wind coming from your back.
– … – … – … –
Finally we arrive to the end of the [B] area, the 2 sections path described on the tech drawing as colour-coded Lagoonode. I did a slightly prettier version of the section:
This view is from the bottom of the bigger lower lagoon, with the waterfall a bit to the left behind. At the top of the drawing we can see the end of “Skylock”, ending in the connection between the wall and the waterfall into the first lagoon.
The first section would be between that point and the end of the first smaller and higher lagoon, connecting into the second larger lower lagoon. The second section would start then and finish near the last waterfall down to the outside of the [B] area. The waterfall would be the last section.
This path would start with “Upper Lagoonode” as the first section.
Continue over the side of the lower lagoon, the second section named “Lower Lagoonode”. Kinda smaller than I expected… Lets see how far I can take this wavy level design.
Finally the end of area [B] with “Fallview”. Has it is visible I have 2 versions of the same room because I can’t exactly decide on what I want here.
But ultimately the objective is fall of the waterfall and end up like:
This is pretty much it. I was actually able to finish this today with the 2 areas described.
I’ll describe the rest of the Big Map on another post since what’s left of the map is an entire area.
This is probably all too boring for anyone to read, but I thought that anything else other than a post about me remembering code would be nice.
But since I mentioned, I’ve started figuring what the code I did does… nice and slow. But mostly I have a feeling about how I programmed. So I was able to touch around for enough time to fixing this very small thing on the scripting’s path finding. This is the result:
So far I only have automatic hinges on those lines that link boxes. But eventually they will be editable. However we can already make quite the spaghetti out of a very simple and very linear script:
I really need some kind of software to get a graphical representation of the dependencies on my code.
I don’t know about any free decent one, for C and C++ mostly.
Doxygen seems to have it, but you kinda “have” to create documentation with that one, and I’m terrible at doing it.
This might actually work for it.
And finally for the second post/part.
Directly to the overmap/worldmap.
(I can’t decide with worldmap or overmap so if anyone has any kind whatever of input in that, please leave it. Pool at the end of the post).
This is the area after you fall from the last waterfall in Fallview [B].
Also last drawing illustration from post/part one.
I have tried to better express the [B] area in the following drawing, named B mapfolding:
It’s a frontal view of the [B] area, with a measure of elevated camera. Pretty much as in the worldmap/overmap.
You can see the cold soft likes are a simplification of the area on the overmap. The red lines is an estimation of the actual maps would take on the actual drawing. Itself a scale of the overmap, hence the red lines a scale of the “platform game world/tunnels” in the bigger world.
What you’ve seen on the mapworld (lets call mapworld to that drawing with all maps I’ve drawn, connected, the one with lots of orange paths), is about 30-35% of the red lines of the [B] area.
Lets proceed locating them.
Under the B mapfolding map you can locate the start on the right side of the lake you fall into from the waterfall. Kinda looks like a pipe turned to the left drawn with red lines.
This start is Falldown:
At the Falldown room you have 2 paths that you can follow.
One exit through above, more specifically the pink ropes, and the other through the right.
There is a possibility of an exit to the left in the future.
I’ll start with the most incomplete rout through the upper exit, and then proceed through the one that takes us further on the right.
The upper exit takes us to Wallstop.
In Wallstop you might have some NPCs houses, or not… maybe just decoration.
Or you can proceed right to Wallclimb.
Wallclimb is where I stopped drawing this path. This path is not on the red lined map I drew previously. This is the map that made me realise of a few hints of a problems.
Even if the path Walldrop > Wallclimb made sense on the 2D map with the red lines, it started bothering my sense of space. This was not exactly what I wanted or expected.
I decided however to push against it. Decided to compromise with my first overmap. Keep trying to make maps that would work on top of it. Follow it’s sense of space.
I have to say though that this conclusion came to me when I was also drawing the right exit path from Falldown. This takes us to Forestpath.
I might have a something of a map above. But you can only proceed right on this map and arrive to Forest Drop.
As the name implies you are supposed to drop from here into another map.
The following map however is composed of 2 rooms, a bit like the previous path. A path as small as the previous Forestpath > Forest Drop is composed of 2 rooms and in engine it is possible I can make it a single one.
I don’t know if these drawings will relate to the room size in my engine in any sense. But for now I am letting myself be restrained by a A4 sheet.
Proceeding, Forest Drop finally takes us to the Forest Bubble pointed as a town in the red lined map. The first room is Forrest Bubble W.
And exactly at it’s right, better pictured at mapworld, is Forrest Bubble E.
Yep, NPCs are kinda supposed to be around here. Lets call them very originally Forest People_ cause they live in the forest.
After the Forrest Bubble you can keep going down, into what seems to be big group of rooms forming a dungeon like thing. At this moment os when I fully realised that this notion of space of going down into deeper forest, instead of to the side, was kinda freaking me out.
Another thing about the Forrestfield map under Forrest Bubble is that I was a bit off then and I had no heart at all while drawing it, so came out shit.
I also drew the 4 rooms into one A4 sheet, and just zoomed the rooms to the double size to make it fit. The quality is worst but I seriously consider using this new measure in the future.
Anyways, Forrestfield NESW.
I knew I needed a new sense of space, but these maps have proven (a bit) one thing. That this notion of half top view map of the game world could pretty well work.
I decided to make a few more maps after this “dungeon”, just to get the idea of how this map organisation could go all the way up to the final product.
I created 2 more paths coming out from the Forrestfield NESW, again left and right.
Through the left we start with The Divide.
And continues through 2 paths on the same room into Collide Clift.
The room Collide Clift has again an upper and lower paths.
This is also the last room created for this path.
So we revert back to Forrestfield NESW and exit through the right into Forrestnode.
Here is plainly obvious that the path forks into 3 different ones. I’ve only done of them so far, and that is the one from the right at mid height of the room.
This exit takes us though the Forrestway A. and Forrestway B. simple and straight forward path.
I did create the lines for the following 2 maps on this path. The last one I can’t really imagine what I was going to name it, but this first was absolutely to be named Forrestway C.
And now I would have some intersection of paths.
This was as far as I went at the time, a few months ago, with drawing to detail my game world.
I decided by then and agree today that I will try to approach the space notion of the game world from a different perspective.
That means that I’ll actually have to draw, and possibly more detailed, overmap. That is exciting.
But I don’t have much wish to lose work with this “experiment”. I’ll end up using many if not all of them in the future world perspective.
I already have an idea running, but I would really like to personally try it with drawing. In any sense of the word drawing, to check how much of it works. I’ll then post results.
All games and fun but the editor should really move forward to a point of actually creating those in my game engine. I have no idea how to go with the code, but I found a few more of my notes, they might help me more forward.
Don’t forget to vote on the pool.
0 voters
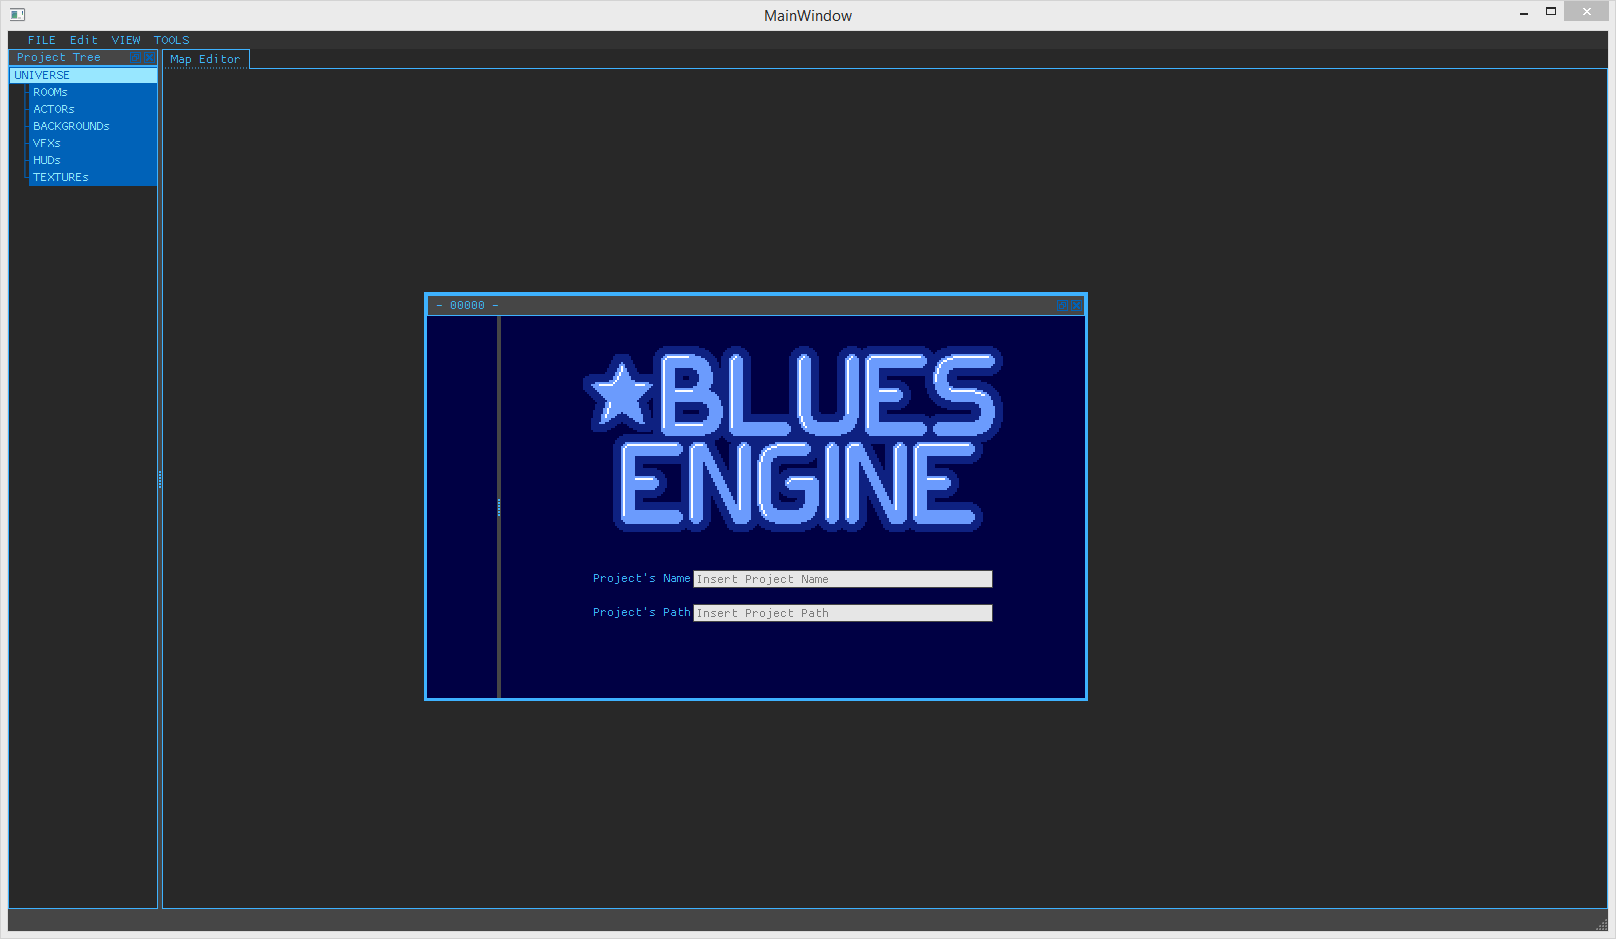
Ok I’ll finally post. Yes I did a window.
That’s all I did and I’m feeling pretty terrible about it.
Still I wanted to create my own in-app type of window. Came out like this:
Took me a few days because I’m being lazy. I haven’t made any commits, I do re-understand the code to a pretty good extent, and I know what I want to do next.
The window above isn’t particularly any decent. Doesn’t have many features that a normal window has, and the features that has don’t work all too well.
However I then remember how one of the rules of programming is not to “reinvent the wheel”. I think I’m getting my programmer groove going.
Decided to use the the same kind of window (QDialog) as in the previously done Tools > Options…
Got it like this:
Ok, lets get along with what I want to do next. Above I found this list:
This new list is already changed with what I deduced I had previously done but not changed in the list.
Some of this newly lined topics I archived how I solved them right here on the thread.
However the list makes it pretty clear what I intended to do next. Data IO, or something like that. Save and Load a SBE Project.
The new window is the first step, now I need to decide on how will I save them.
I’ll end up making a save structure pretty much like a Unity or Unreal. A group of folders inside the Project folder. You can drop files there from anywhere and the editor should automatically update.
It is going to be pretty tricky when files start being deleted but… I’l try to manage.
I am also very afraid to progress because… I find the simplicity of the code suspicious.
I don’t get many bugs, some minor stuff, but I get this feeling that I’m leaking somewhere or that I’m forgetting some detail that will lead to a super hard to catch bug.
But I’ll keep on moving and hope that I get lucky on the eventual bug hunting. This feeling is probably some kind of paranoia due to te fact that I have no “code architecture plan” for the application.
Bleah!!!
Ok, I think I got it. Also lets try a different kind of post.
I’ll start with updating a TODO list to accommodate what I’ve learned so far about the project.
Got to a few great conclusions about how to proceed with the project, and this means changes to “the plan”.
I think I’ve also got to an understanding of my own engine that allows me to actually proceed to the next step of the editor. Saving a project. These won’t be C files to compile for GBA, but actual edition files for the editor.
I’ll proceed exposing how I played around with the engine’s game objects, how I found some weakness, and future options for a better game engine. This means that I really got a good portion of my mind right for getting the project moving again.
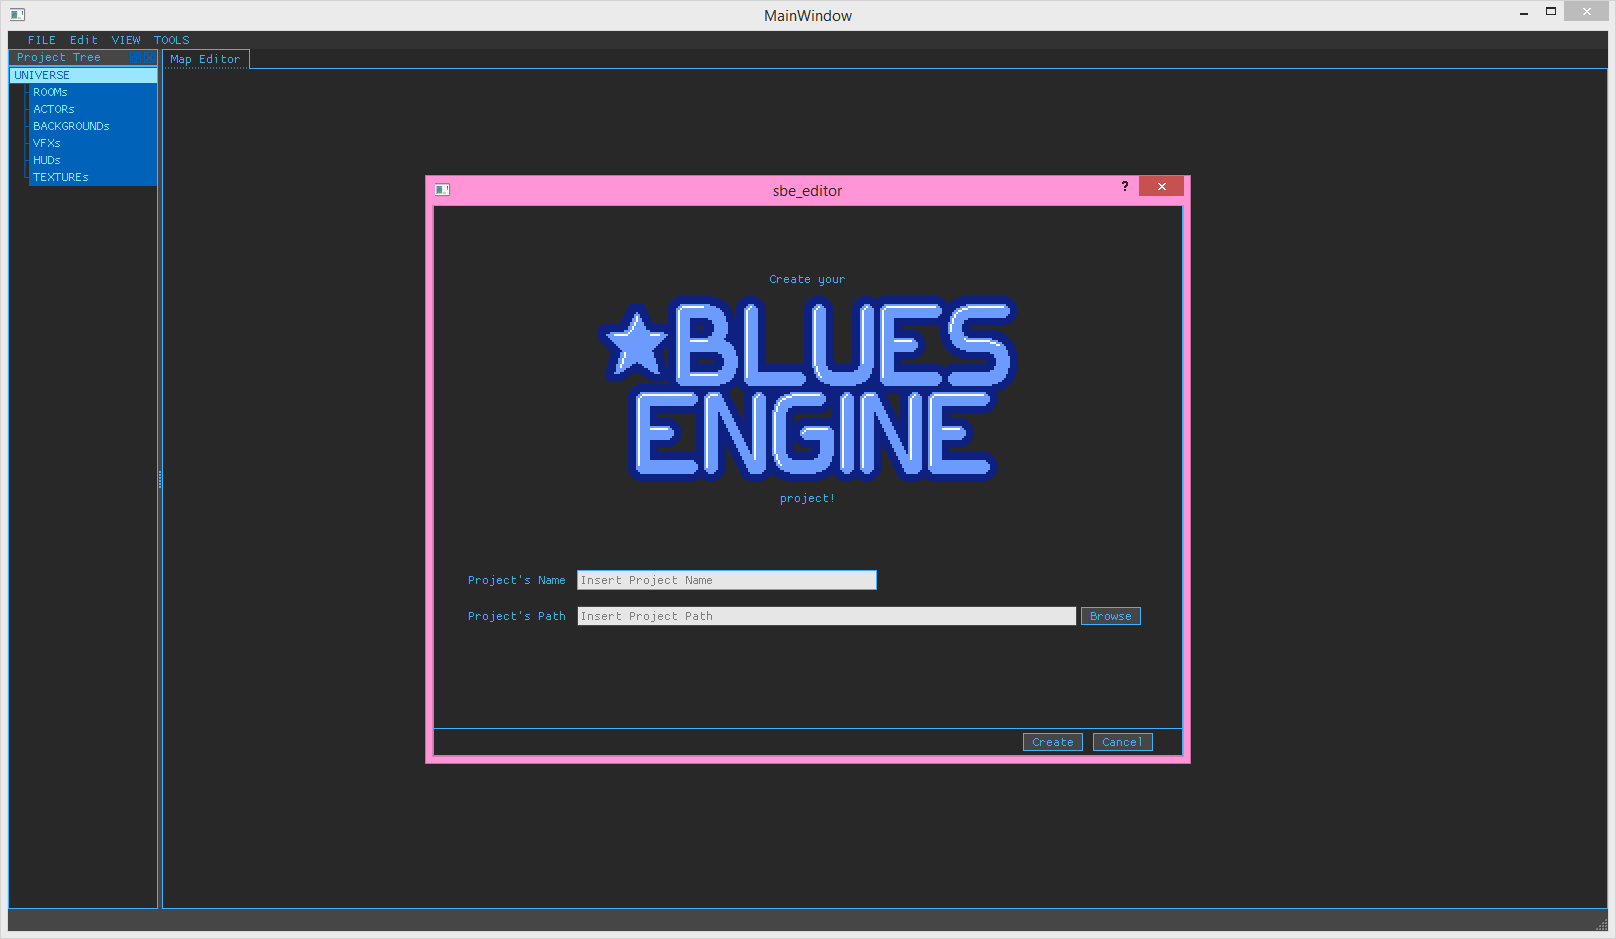
Finally, during the time since my last post I was able to finish the layout of the “New Project” window. Simple and direct, but all functionalities are in place for the exception of actually starting a new project.
Doing a window like that really got me back into the groove of how to design desktop apps layouts just with code. Good times.
I’ll start with the end basically. After all this going around making 1 single window and reading, remembering, and getting the project back into my brain, I finally realised how it can proceed from here on.
That resulted in changing the TODO list, and the consequent flow of the project.
That was pretty much necessary because the previous flow was… no flow at all.
This next list has a few things that I’ve never talked about here, but they will have their own explanation and how they came to be along with the post.
The list above shows I’ll be focusing myself on developing the editor’s project persistence.
I did the new project window but I didn’t had an exact folder and files structure. I did have a direction I wanted to take. To “dissolve” the project in many files. Each with data about one specific reusable object/structure in the game.
I had two main worries while thinking about this this “distribution of files”. I personally cal it this “project>code>engine organisation” (I more and more have this feeling of an interconnecting flow):
However, this had only came to me a couple of days ago. I got to this direction after playing around with the editor’s code, and the project’s concepts.
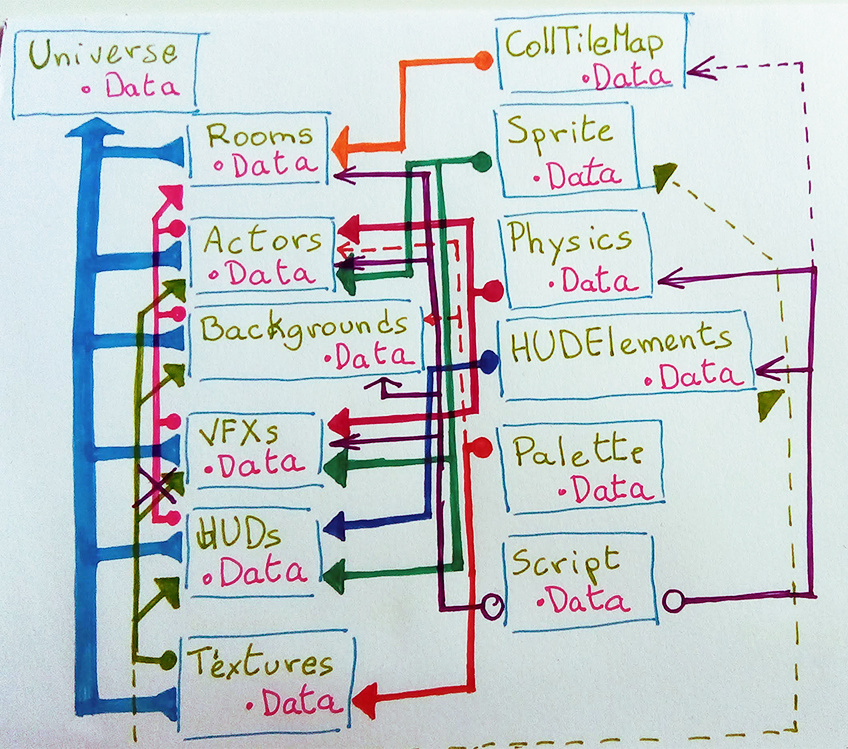
So to really get my brain going on this… “organising thing”, I had to be capable of “seeing the everything”. Personally there is no better way of “seeing” a specific “everything” is drawing “it” with pen and paper (or pencil, whatever).
Don’t mind the connections at all, forget them even. What matters here are the boxes. With a first quick look through the code, and some memory work, I can reduce the engine’s core structures to the ones shown above.
Lets call them Core Data Structures for now, these are what you create to define “game”.
How did I get to them? They actually exist on my GBA code, as concept. They have similar names (most of them), so if it has a name it exists as concept. Code only makes it functional.
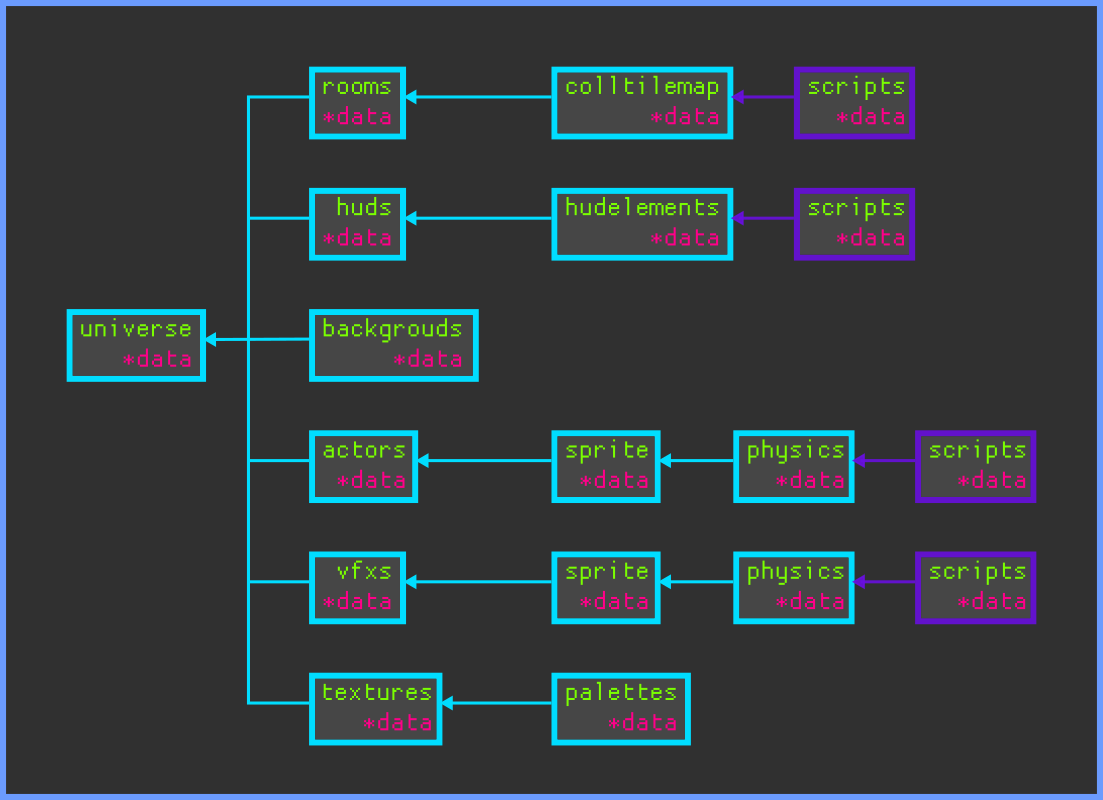
But my objective was the dependencies between structures and hence I moved along trying to figure it out. Decided to get into the PC and work with some vectorial graphics, they are faster to use after some work:
Well… this also doesn’t look too good, so I decided to take a different approach and organise the flow chart to represent each object’s dependencies in C code. Also added some neon.
This looks a lot better. Allowed me to realise that both UNIVERSE and SCRIPTS are almost like omnipresent entities on the game. The universe is obvious because it is basically the cylinders on a car engine. What makes the clock tick-tock. The one which holds everything else of the game world (doom doom dooooooooom).
But scripting is also present on the universe, from the bottom, and within the game objects. This is rather convoluted to be honest, specially on the C/C++ dependencies point of view.
This is because the UNIVERSE can naturally work on it’s elements. The UNIVERSE can change ROOMS, ACTORS, BACKGROUNDS, because they are included in UNIVERSE and stored within it’s own allocation.
But the scripts must also be able to act upon the game objects (actors, roms, hud), because that is their function, yet not their authority. To execute that function, scripts “know” the other objects as well as they have to know it so they can hold their own script.
You’re not understanding shit right? Neither do I… this situation is probably called something like “circular referencing” or someshit. The result is this means some seriously shady C code, and back-bone-bending to get it done. Otherwise know as “forward referencing” or someshit.
Decided to leave it alone for now because the engine is working. I’ll worry about making sense and making it work better later.
Having decided on the most important to edit objects inside my engine, and how their dependencies should work was great. But I had to figure a way to organise the game objects into files. Different files with interconnections editable on editor, and realised on engine.
Decided to keep working on those vectorial graphics, since it was there and was fast. Really didn’t worked all that well:
Hard to understand what’s folder and file (more like impossible).
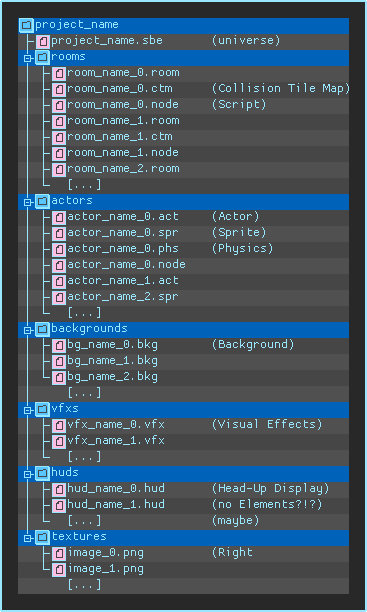
So finally I ended up with this vision of a file system:
Each game object created by the editor would have it’s file or files. Name and extension would serve to claim the object’s owner and it’s function.
I have thought of another alternative structure. I really need to put it here so it doesn’t get lost on a ton of paper (causes me more impact here, believe it or not).
Another alternative would be a folder only system like this:
project_name
 ├ assets
 │  ├ textures
 │  ├ sounds
 │  └ musics
 └ meta (or whatever)
    ├ rooms
    ├ actors
    ├ backgrounds
    ├ vfxs
    ├ huds
    ├ colltilemaps
    ├ sprites
    ├ physics
    ├ hudelements
    ├ palettes
    └ scripts
So far I can detect that the latest is the file system that by far motivates more re-usability of te biggest number of created objects.
I.E. using the same exact physics through out 20 different types of enemies (not run time enemy instances).
But it has 2 major disadvantages.
First I’ll have to create a way to edit, create, delete, and keep in check every single object for every single type (no longer “actor responsible for it’s own physics”). I have to give attention to that right now because if I want to treat all game objects the same, I should make them the same on code.
I could also implement all these functions on the object base itself. But my problem with this disadvantage is “how to allow creation, editing, and deletion, of each of the objects to the user”.
The second disadvantage is that it is a bucket load of files, and the user absolutely should not mess with the files. Broken projects for editing one character on one file outside the editor.
Meaning, a clusterfuck to keep everything in check… or stupidly simple if I get a good system to do it with the system above??? Any ideas?
How does fucking unity does it to keep all those files in check in real time.
Finally, the first thing that I finished during all this time was actually the last I’ll talk about this time.
The layout for the “New Project” window.
It’s looking like this:
And that’s pretty much it.
I would like to conclude with a summary, for self reference mostly and to clear how to proceed.
I should really focus on the next topics of the TODO list, and get persistence going.
This is very important because right now I am converting my GBA Tech Demo C code to get the project going.
That means to process all those pictures from text files which pixels are written as numbers on a list. SO GET IT DUUUUUNE.
After that I press into the scripting edition, but I should actually be careful and only stabilise it enough to check if the saved values are the same as the values on the C files, and if they are all of them.
Then proceed to editing tools immediately, the easiest ones, to get more practice at Qt.
But I should really pay attention at the editor > engine flow. Start looking forward to get working om both codes at the same time, improving both. This could come much later but optimisation will have to be done eventually. Even if premature optimisation is an error, I rather do at least some of it while the code is fresh, smaller, and less complex. Helps preventing added complexity.
TBH I really didn’t felt like posting. Still feeling insecure I guess.
I could have done this post 2 days ago, but the constant chilly silence of the thread really… well… It’s a new experience for me only. I did once a blog when I was developing stuff on the PS2.
No one knows where the blog is, so yeah… I actually had no audience and I was ok with it then.
I’m wondering if I actually care about that or if I’m faking caring that in order to feel more human or some bullshit like that. hmmm… also not in the best mood.
Anyways, I kept delaying it and prettying things up the code. Slight adjustments to make the code less prone to bugs. However I’ll actually make a commit this night (also have been delaying those), and afterwards I’ll spend the next couple of days cleaning code or something.
So… enough talking about me, down to the stuff. The TODO list I guess… this is all about maintaining a purpose or something.
So yeah, I think I’ve decided for a different type of folder structure.
I’ll make the one that has more folders, but keeps each of the structures separated.
I’ll change it back if it add too much complexity, and chose a simpler version of the structure.
This also means that I’ll probably change the project tree on the Editor into having more sections. NICE IDEA - think about adding virtual folders to a tree, to allow organising assets into different groups inside each type group. Or just find a way for the tree to display as the user wants. BLEEEAH.
Anyways, I finished doing the Wizard… and I’ll probably throw it away.
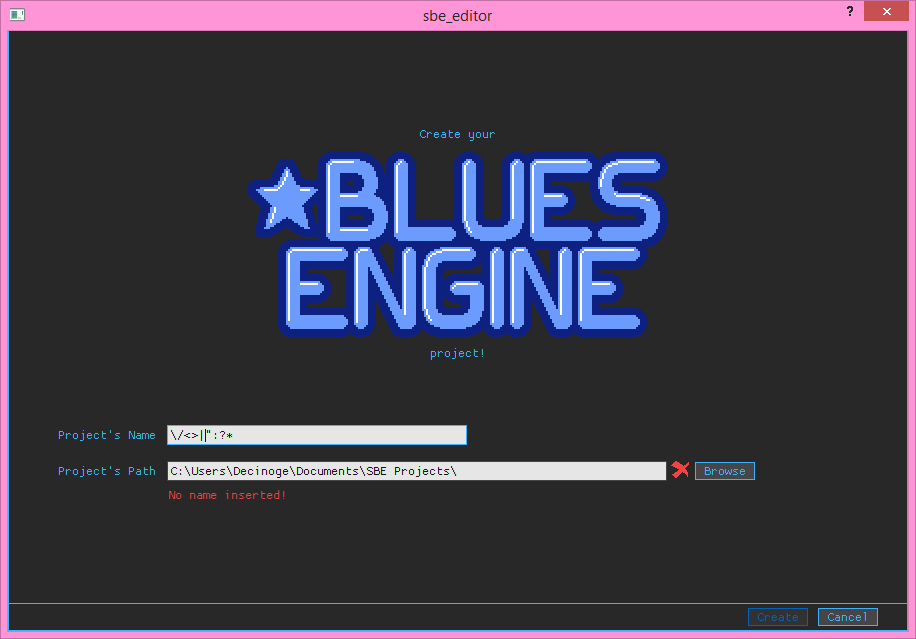
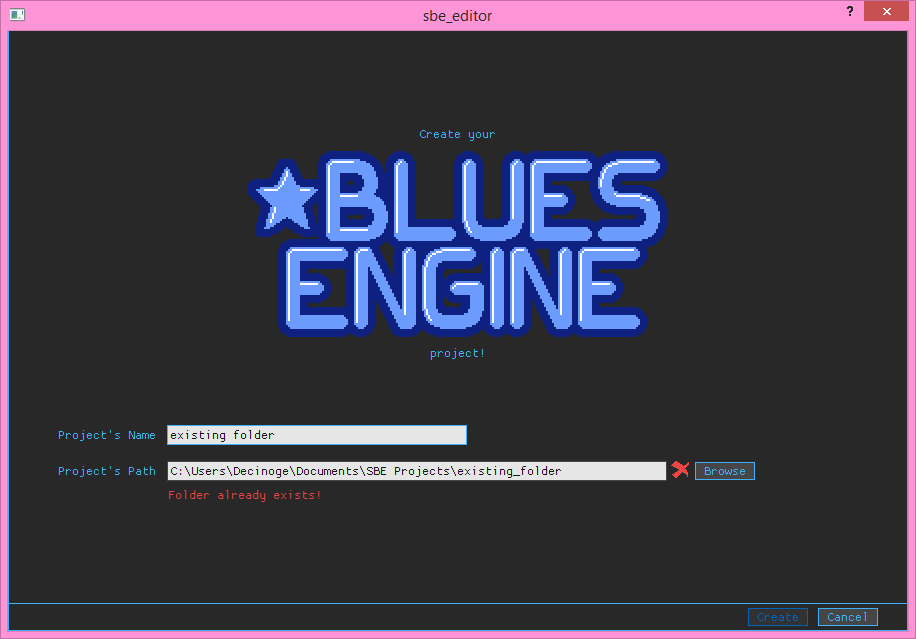
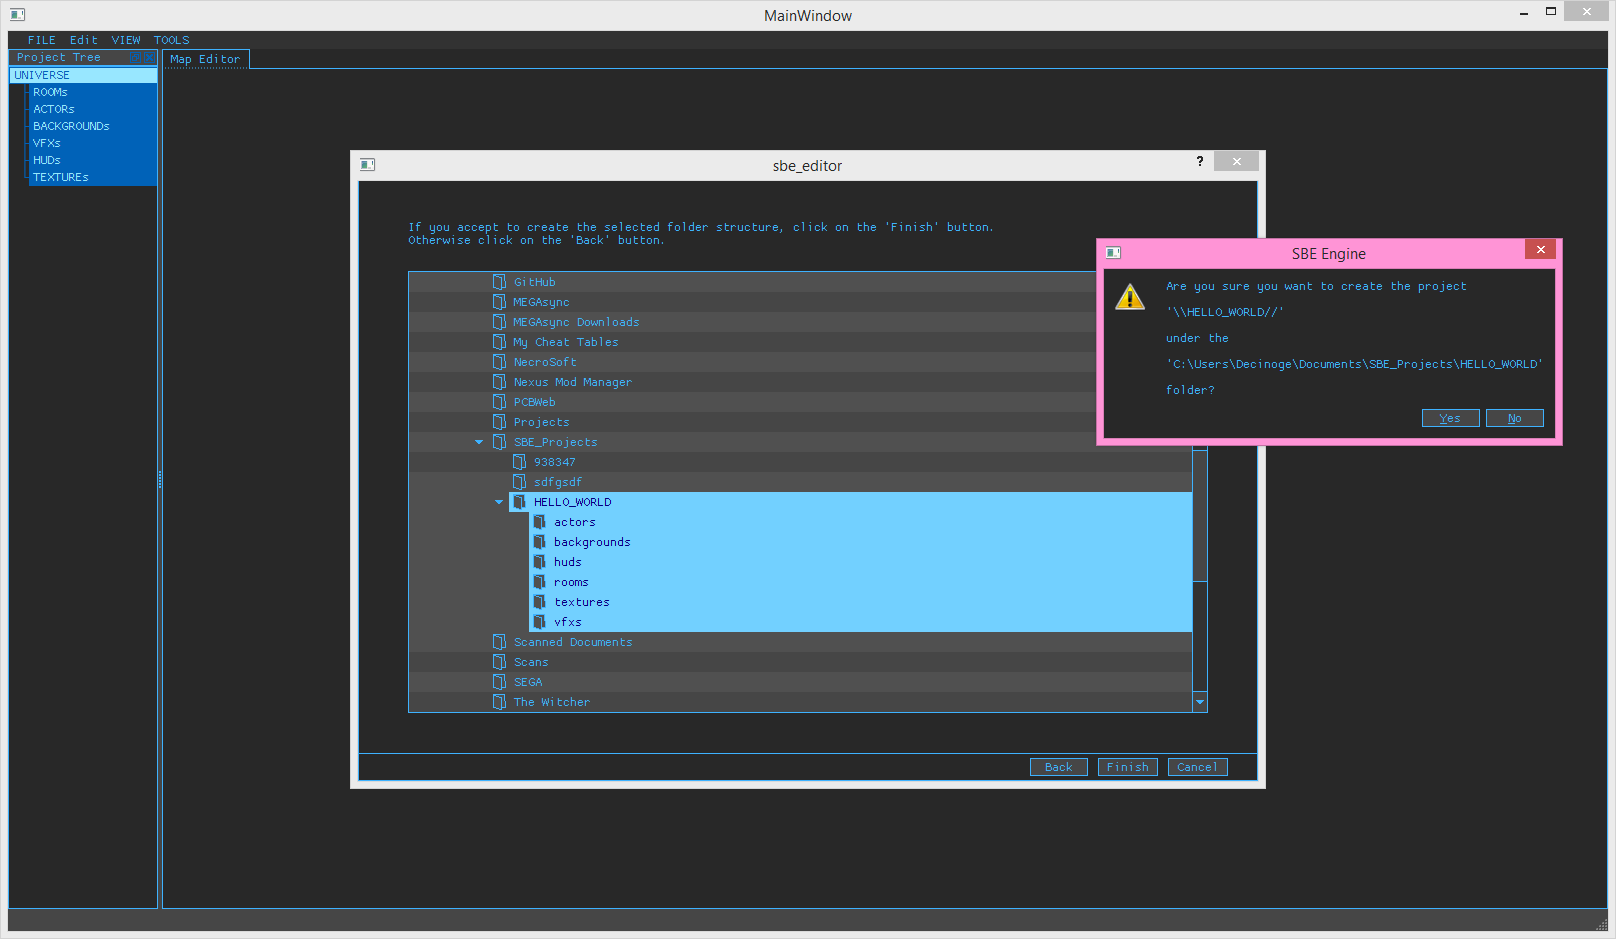
Beyond the screen posted on previous pictures, I added 2 more screen and a prompt.
Like so:
After this I had to dig, and change, quite a bit of my old code to allow me the future file shenanigans that I wish to do. Eventually got to the point of being able to create the folders I wanted, and where I wanted.
Create a new and empty Project on the editor. Also had to work around to not mess up on passing up paths to folders and files with strings. Name, Universe name, and file name are 3 completely different things, but at some points they converge.
Well… this really isn’t the place to write about this small stuff, but yeah. Yesterday I spent half my day’s work on this project just double checking with prints if the paths were being passed around the application in a close enough manner.
This is the kind of stuff I was discussing on axe about “knowing programmer’s education stuff”.
I’m betting there’s ways to define these things, that allow these strings to be passed around with minimum risk for bugs.
Also probably there’s ways in, desktop applications like this, to have one cool entity to take care of this stuff by itself. But I have no idea how it goes and works, can’t even vision it.
In these times I feel a bit low.
If a programming matter if for video games, I can usually see a way around the problem.
But serious serialisation like for some big project, or a complex thing like a desktop application, I feel the limits of my own knowledge.
Probably getting old for having myself demotivated to easily.
Maybe I should read at least a couple of small books about it.
I guess that wouldn’t be lost time O.o
Anyone around knows any good and small Qt books?